CoreData, bindings & multiple nibs
Most modern Mac applications are designed around single window / multiple views architecture. Examples are iPhoto, iMovie etc. Although this results in more streamlined user experience, it brings some issues for the developers.
Introduction
I’m not going into details about various aspects of such implementation - see the excellent posts on NSViewController on KATI’s blog for more in-depth discussions and solutions - part 1, part 2 and part 3 posts on XSViewController for example. I will instead focus on handling CoreData with bindings over such implementation. Specifically how to deal with dependencies between data displayed in different nibs. Additionally I want to do the bindings in Interface Builder instead of resorting to code.
I found this information scattered around various web lists and blogs, so this article is hopefully linking together the info from various sources. I wish to thank and credit all developers from cocoa dev list who helped me come to the solution explained below. Note that you should be familiar with both CoreData, bindings and working with controller layer in Interface Builder - if not, check some of the tutorials on the web.
Data model
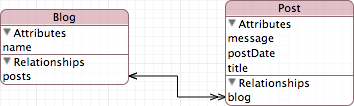
The application which will demonstrate one possible solution serves as a blog handling tool. It allows creating different blogs and manages posts for each. Each blog has a name and each post a title, message text and date posted. Each post is linked to a specific blog and each blog can have many posts. The model is shown here:
And this is how the finished application will look like:
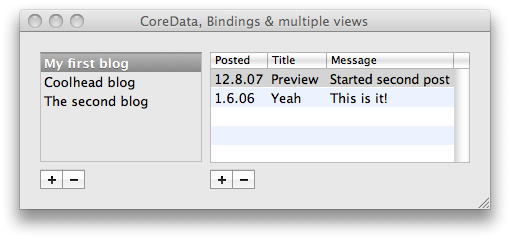
The left part handles the list of blogs and the right the list of posts for currently selected blog. Straightforward, except that each part is implemented in it’s own nib… But let’s do it step by step.
Main window & application delegate
The whole solution is based on the fact that each nib has the link to the main NSApplication instance. As usual MainMenu.xib together with the application delegate is the central point which ties together all the pieces of the puzzle:
- MainMenu.xib creates the main window which contains placeholder views.
- Application delegate creates the actual view controllers
- Placeholder views are replaced by the actual ones from view controllers.
Let’s do that - create a new Core Data application project (not document-based), save it and open the MainMenu.xib in Interface Builder. Double click on the main window to open it and drag two custom views from the library. Then position them similarly as shown in the screenshot above. The left view should have autosizing set so that it resizes vertically, while the right view should also resize horizontally. Note that instead of two views, you can also use NSSplitView, but for this example I chose two separate views.
To be able to associate actual views to their placeholders, we need to
be able to interact with the placeholders in the nib file, so we need to
add IBOutlet for each. We do this by adding the following variables in
the application delegate header file (I renamed it to AppDelegate in
my project):
IBOutlet NSView* blogsPlaceholderView;
IBOutlet NSView* postsPlaceholderView;
Then back to Interface Builder and control-drag from the application delegate object to the two views we created and map them to the corresponding outlet. We’re done here for the moment, let’s create the first view.
Blogs view & controller
This one is straightforward. First create a new Cocoa class with name
BlogsViewController and derive it from NSViewController. Create the
designated initializer - I chose to use init and call super class’
initWithNibName:bundle: specifying the name of the nib file. For this
simple example this embeds the name of the nib inside the view
controller class and makes the client code less cluttered. And that’s
all the coding we need for our blogs view controller for the moment.
Let’s create the user interface - create a new View XIB and name it
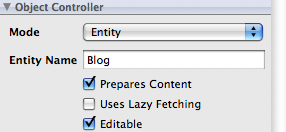
BlogsView. Open it in Interface Builder. Drag an array controller to
the nib and rename it to Blogs Controller. Then edit it’s attributes
pane like this (you can leave the rest of the options to their
defaults):
We also need to setup the bindings so that we can get the managed object context:
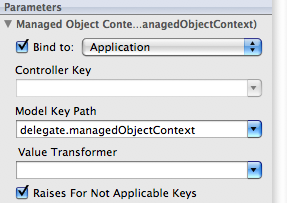
Here you can see the first difference from binding directly in
MainMenu.xib - we bind to the Application, specify no controller key
(the input field is disabled anyway) and the model key is
delegate.managedObjectContext. Just take into account that
Application points to [NSApplication sharedApplication] (or NSApp
shortly) and it’s delegate is our AppDelegate (this was done for us in
MainMenu.xib by the project template so it might not be totally
obvious). And AppDelegate has a member method (and ivar)
managedObjectContext. So thanks to KVC we can use the keypath to get
to our managed object context. If we would want to do the same in code
it would look like:
[NSApp valueForKeyPath:@"delegate.managedObjectContext"]
or alternatively in this case we could use methods since they are part of public interface:
[[NSApp delegate] managedObjectContext]
This is the whole trick to the rest of the bindings as well…
But let’s finish the nib first. We need to provide our custom view
instance to NSViewController. In order to do so, we first need to change
the class of the File’s Owner to our custom class we just created -
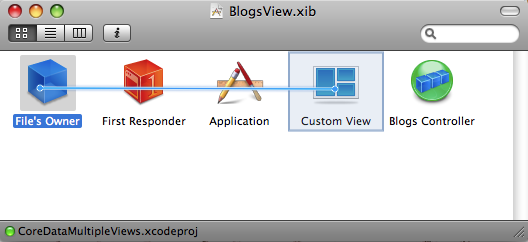
select File’s Owner and switch to Identity tab in the inspector.
Enter BlogsViewController in the class field:
![]()
We can setup the view link now - control-drag from File’s Owner to
Custom View in the nib window and assign it to view (if this is
forgotten, NSViewController will raise an exception when loading the
nib):
The rest of the work is to layout the actual view content. Double click
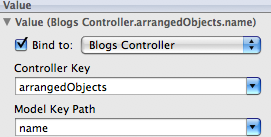
on Custom View to open it and drag a table to it. Configure the table
autosizing to resize in both directions and make it a one column table
with column’s Value bindings setup to Blogs Controller with
Controller Key arrangedObject and Model Key Path as name (you
can use shift-control-click over the table to get a handy context menu
where you can select the column directly):
We also want to be able to add and remove blogs - drag two buttons from
the library below the table. Edit both buttons autosizing to
bottom-left. Then control-drag from the buttons to the
Blogs Controller and assign them to add: and remove: respectively.
All standard stuff…
If we would run the application right now, nothing would show - we still
need to make the view a part of the main window view hierarchy. So back
to AppDelegate - first in the header, define a new ivar:
BlogsViewController* blogsViewController;
Then we need to initialize it and make it’s view as part of the main window. The code looks like this:
- (void) awakeFromNib
{
  blogsViewController = [[BlogsViewController alloc] init];
  [self replacePlaceholder:blogsPlaceholderView withView:[blogsViewController view]];
}
Simple - initialize the view controller and replace the placeholder view with the real one. The replace method takes care of copying the layout options from the placeholder to the given view and replaces the placeholder with the view itself. This allows us to specify the desired autosizing while editing main window in Interface Builder and re-use the settings for actual views without duplicating the setup in view nibs (see the example project for the actual code). I’ve made it a method since we’ll reuse it for posts view shortly.
Note that in case there are several possible views for a single placeholder it would be better to add the view as children of the placeholder instead of replacing it. To setup autosizing in such case, we would either assume all views should resize in both directions and fixate that in code or we would simply add the view and keep the autosizing as setup in the view nib. Using the later would require proper autosizing setup in Interface Builder for each custom view.
Now you can run the application and manage the blogs. Cool but let’s add the posts into the equation.
Posts view & controller
This is done exactly the same as the blogs view we just finished. The steps are exactly the same, so here is only a short check list:
- Create class
PostsViewControllerderived from NSViewController and make it’s designated initializer load the view fromPostsViewnib. - Create PostsView.xib and open it in Interface Builder.
- Drag NSArrayController from library and setup it’s attributes
Mode to
Entity, Entity name toBlogand check Prepares Content. Bind Manged Object Context toApplicationwith Model Key Path asdelegate.managedObjectContext. - Drag NSTableView to custom view and make it 3 column table. Bind
column’s Values to posts array controller with controller key
arrangedObjectsand model key paths aspostDate,titleandmessagerespectively. Setup table’s autosizing to resize automatically in both directions. - Drag two buttons below the table view, setup autosizing to
“bottom-left”, then control-drag from each button to posts array
controller and bind them to
add:andremove: - Change File’s owner identity class to
PostsViewController. - Control-drag from File’s Owner to the Custom view and assign
to
view.
- Drag NSArrayController from library and setup it’s attributes
Mode to
- In
AppDelegateadd thePostsViewControllerivar, then initialize it and replace placeholder view inawakeFromNib. It’s important to initialize it after blogs view controller (read below)!
These are exactly the same steps as for blogs view. Except that we want to show only the posts for currently selected blog. So how do we get that information - we don’t have blogs array controller in posts view nib?
It’s the same trick we used for getting the managed object context -
through the Application instance. Since we added the
BlogsViewController as an ivar of the AppDelegate we can access it
through KVC key path! So return to the posts array controller bindings
and setup the Content Set as shown here:
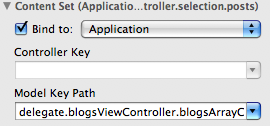
The model key path is not fully visible on the screenshot so here it is:
delegate.blogsViewController.blogsArrayController.selection.posts
A bit long, but essentially the same as if linked to a local controller
(if we would link to local controller, we would select blogs array
controller as the binding with Controller key as selection and
Model Key Path as posts, however behind the hood, this would be
converted to key path of selection.posts. So essentially the only
difference is that in our case we need to prepend the key path to the
blogs array controller).
What about blogsArrayController in the above key path, where does it
come from some of you might ask? You’re right, if we run the application
as it is now we would end up with a runtime error - the
blogsArrayController is nowhere to be found in the keypath. I
intentionally left this out because it was not needed up until now. To
get the blogs array controller out of the blogs nib, we need to define
an IBOutlet in the BlogsViewController and map it to the array
controller within the blogs view nib. Do that and run the application
and you should be able to manage posts for each selected blog! (Note
that in the example project, I also did the same for posts array
controller within the posts view, but this is not needed for the
application to be functional)
Important: because posts view relies on blogs array controller from blogs view, PostsViewController needs to be initialized AFTER BlogsViewController. This kind of dependencies can easily be automated by using accessors that create objects on demand, but for the sake of simplicity I use plain ivar.
Conclusion
Although it might not be as intuitive from the start - it took me a while to grasp the whole idea - but as you can see you can use the same mechanisms for handling dependent views distributed over different nibs as you would for local ones. The key paths entered are longer and more error prone, but these errors are easily caught at application startup.
Note that in the example, the main window is created in the MainMenu.xib
and is controlled by the AppDelegate. In more complex scenarios, the
window would be handled by a custom nib and NSWindowController subclass.
The placeholder views (in most cases there’s a singe NSSplitView) might
be handled by their own NSViewController subclass as well. However for
this example this would all divert the attention from the actual problem
I was solving. Also, for simplicity, I use plain NSViewController here,
but you can easily extend the project with above mentioned solutions.